

 分类:
.net后台框架
分类:
.net后台框架
目录与前言
目录链接:.net core Ocelot 简单网关集群熔断架构整合目录

基于上一篇文章展开 Ocelot 与 Consul 进行合并
创建一个Ocelot网关项目
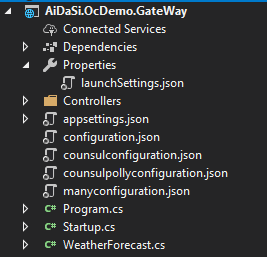
1. 创建项目 AiDaSi.OcDemo.GateWay 项目结构如下图所示
2. 双击项目名修改如下
<Project Sdk="Microsoft.NET.Sdk.Web">

  <PropertyGroup>
    <TargetFramework>netcoreapp3.1</TargetFramework>
  </PropertyGroup>

  <ItemGroup>
    <PackageReference Include="Ocelot" Version="14.0.11" />
    <PackageReference Include="Ocelot.Provider.Consul" Version="14.0.11" />
    <PackageReference Include="Ocelot.Provider.Polly" Version="14.0.11" />
  </ItemGroup>

</Project>
3. 修改 Startup.cs 如下
public class Startup
{
public Startup(IConfiguration configuration)
{
Configuration = configuration;
}
public IConfiguration Configuration { get; }
public void ConfigureServices(IServiceCollection services)
{
//services.AddControllers();
services.AddOcelot()
//使用 counsulconfiguration.json 并添加 Ocelot.Provider.Consul 包
.AddConsul()
//使用 counsulpollyconfiguration.json 并添加 Ocelot.Provider.Polly 包
.AddPolly()
;
}
public void Configure(IApplicationBuilder app, IWebHostEnvironment env)
{
app.UseOcelot();
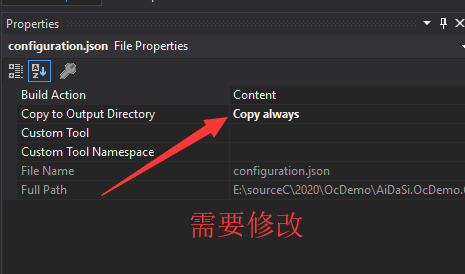
}4. 创建 configuration.json
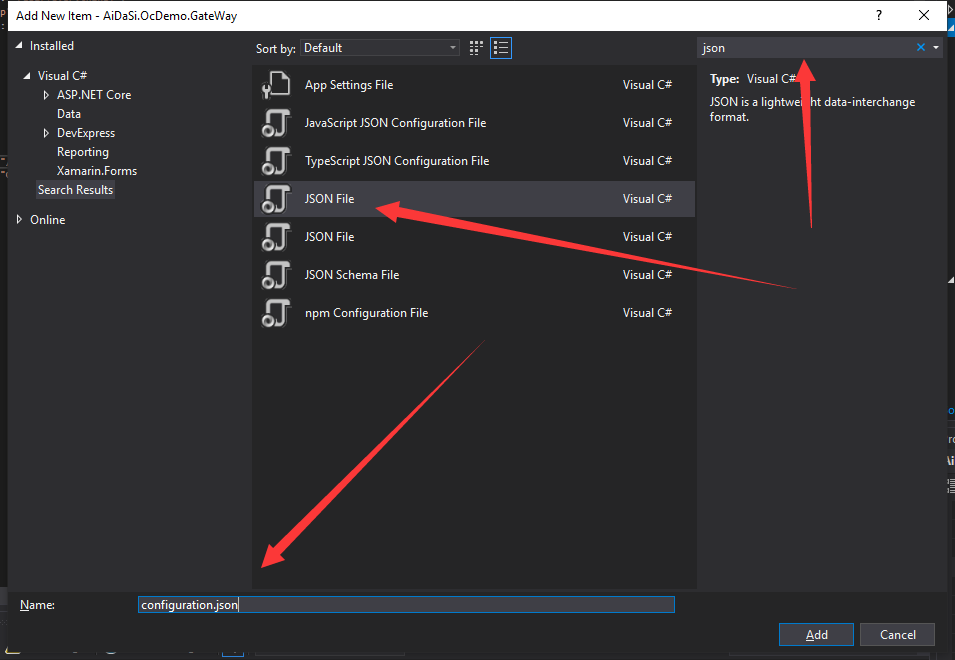
注意所有 json 都需要设置属性
然后先来 康康 负载均衡的配置
{
  "ReRoutes": [
    {
      "DownstreamPathTemplate": "/api/{everything}",
      "DownstreamScheme": "http",
      "DownstreamHostAndPorts": [
        {
          "Host": "localhost",
          "Port": 5726
        },
        {
          "Host": "localhost",
          "Port": 5727
        },
        {
          "Host": "localhost",
          "Port": 5728
        }
      ],
      "UpstreamPathTemplate": "/{everything}",
      "UpstreamHttpMethod": [ "Get", "Post" ],
      "LoadBalancerOptions": {
        "Type": "RoundRobin"
      }
    }
  ],
  "GlobalConfiguration": {

  }
}
5. 修改 Program.cs
public class Program
{
public static void Main(string[] args)
{
CreateHostBuilder(args).Build().Run();
}
public static IHostBuilder CreateHostBuilder(string[] args) =>
Host.CreateDefaultBuilder(args)
.ConfigureAppConfiguration((hostingContext, config) =>
{
config
.SetBasePath(hostingContext.HostingEnvironment.ContentRootPath)
.AddJsonFile("configuration.json", false, true)
.AddEnvironmentVariables();
})
.ConfigureWebHostDefaults(webBuilder =>
{
webBuilder.UseStartup<Startup>();
});
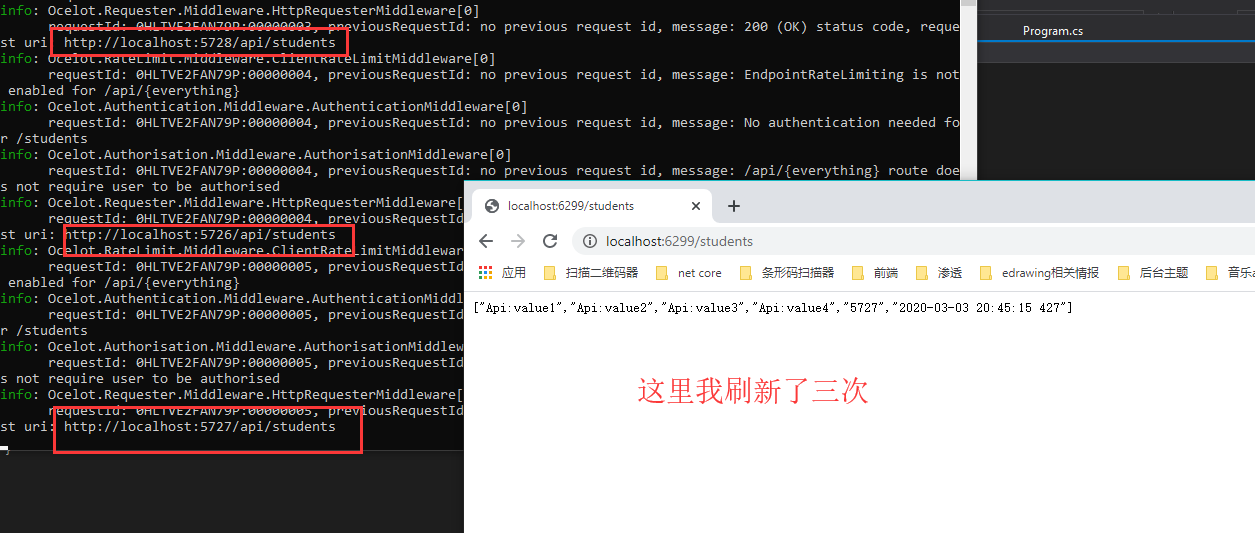
}6. 运行 康康
多节点网关分配
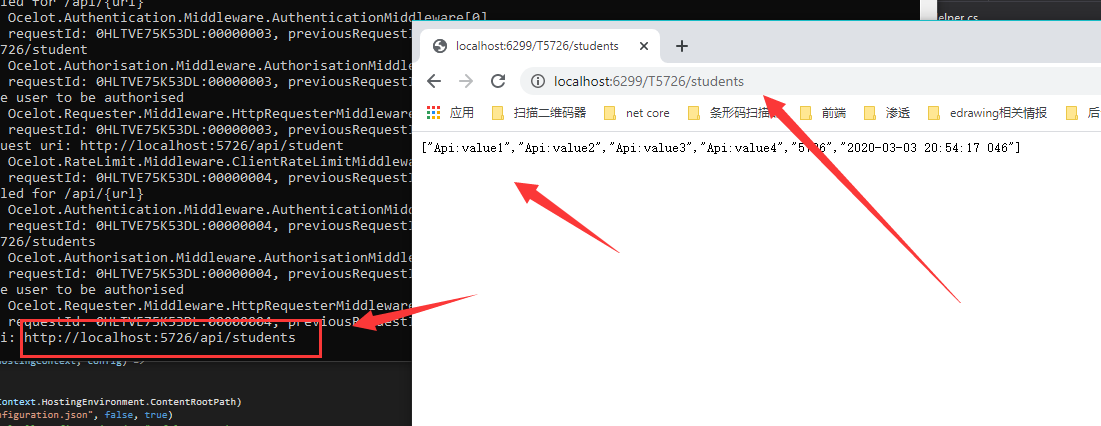
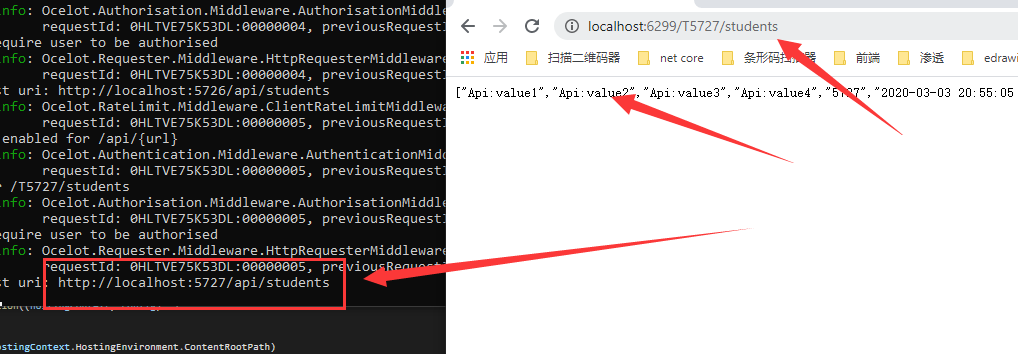
1. 创建的 manyconfiguration.json 配置如下
{
  "ReRoutes": [
    {
      "UpstreamPathTemplate": "/T5726/{url}",
      "UpstreamHttpMethod": [ "Get", "Post" ],
      "DownstreamPathTemplate": "/api/{url}",
      "DownstreamScheme": "http",
      "DownstreamHostAndPorts": [
        {
          "Host": "localhost",
          "Port": 5726
        }
      ]
    },
    {
      "UpstreamPathTemplate": "/T5727/{url}",
      "UpstreamHttpMethod": [ "Get", "Post" ],
      "DownstreamPathTemplate": "/api/{url}",
      "DownstreamScheme": "http",
      "DownstreamHostAndPorts": [
        {
          "Host": "localhost",
          "Port": 5727
        }
      ]
    }
  ],
  "GlobalConfiguration": {

  }
}
2.修改 Program.cs
.AddJsonFile("manyconfiguration.json", false, true)3. 运行结果
好了回归主题!
Ocelot与Consul结合服务进行配置
counsulconfiguration.json
{
  "ReRoutes": [
    {
      "UpstreamPathTemplate": "/consul/{url}",
      "UpstreamHttpMethod": [ "Get", "Post" ],
      "DownstreamPathTemplate": "/api/{url}",
      "DownstreamScheme": "http",
      "ServiceName": "AiDaSiService",
      "LoadBalancerOptions": {
        "Type": "RoundRobin"
      },
      "UseServiceDiscovery": true
    }
  ],
  "GlobalConfiguration": {
    "BaseUrl": "http://127.0.0.1:6299",
    "ServiceDiscoveryProvider": {
      "Host": "localhost",
      "Port": 8500,
      "Type": "Consul"
    }
  }
}
过程我都不说了
直接运行
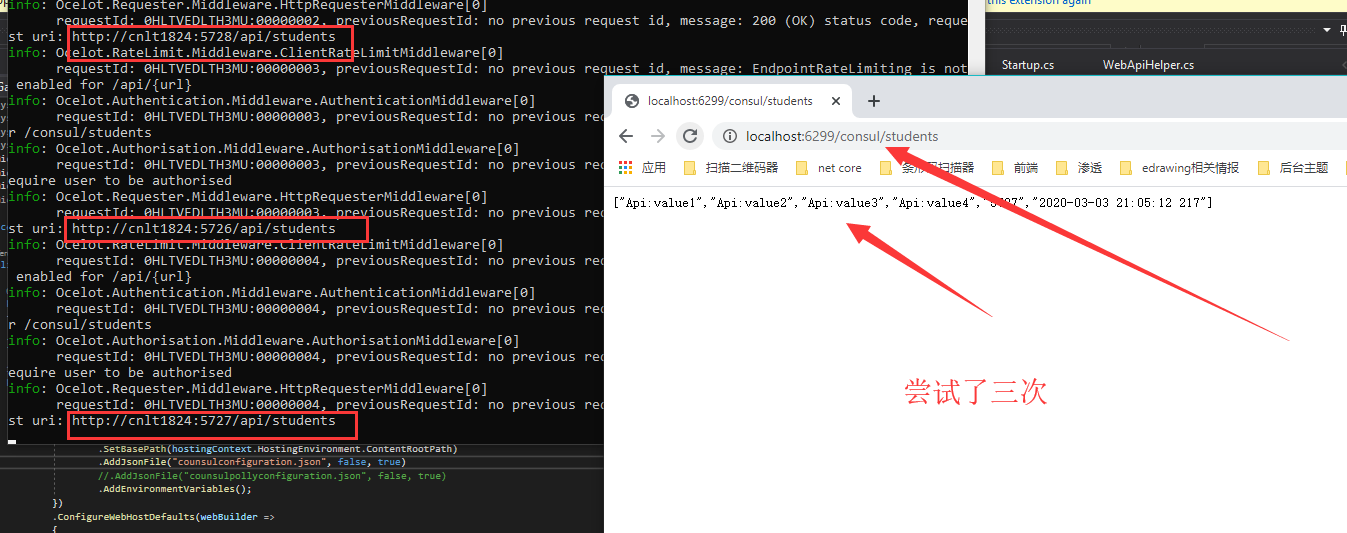
心细的你相信已经看到了,访问的是 node 节点的 hostname
这里是通过 Consul 服务节点进行的访问
接下来我们继续!!!
Ocelot与Consul 熔断与限流配置
counsulpollyconfiguration.json
{
"ReRoutes": [
{
"UpstreamPathTemplate": "/consul/{url}",
"UpstreamHttpMethod": [ "Get", "Post" ],
"DownstreamPathTemplate": "/api/{url}",
"DownstreamScheme": "http",
"ServiceName": "AiDaSiService",
"LoadBalancerOptions": {
"Type": "RoundRobin"
},
"UseServiceDiscovery": true,
//"RateLimitOptions": {
// "ClientWhitelist": [], //白名单
// "EnableRateLimiting": true,
// "Period": "5m", // 1s,5m,1h,1d
// "PeriodTimespan": 5,//多少秒之后客户端可以重试
// "Limit": 5 //统计时间段内允许的最大请求数量
//},
//缓存
"FileCacheOptions": {
"TtlSeconds": 10
}
//"QoSOptions": {
// "ExceptionsAllowedBeforeBreaking": 3, //允许多少个异常请求
// "DurationOfBreak": 10000, // 熔断的时间,单位为ms
// "TimeoutValue": 10000 // 如果下游请求的处理时间超过多少则自如将请求设置为超时 默认90秒
//}
}
],
"GlobalConfiguration": {
"BaseUrl": "http://127.0.0.1:6299",
"ServiceDiscoveryProvider": {
"Host": "localhost",
"Port": 8500,
"Type": "Consul"
},
"RateLimitOptions": {
"QuotaExceededMessage": "Too many requests,maybe later?11", // 当请求过载被截断时返回的消息
"HttpStatusCode": 666 // 当请求过载被截断时返回的http status
}
}
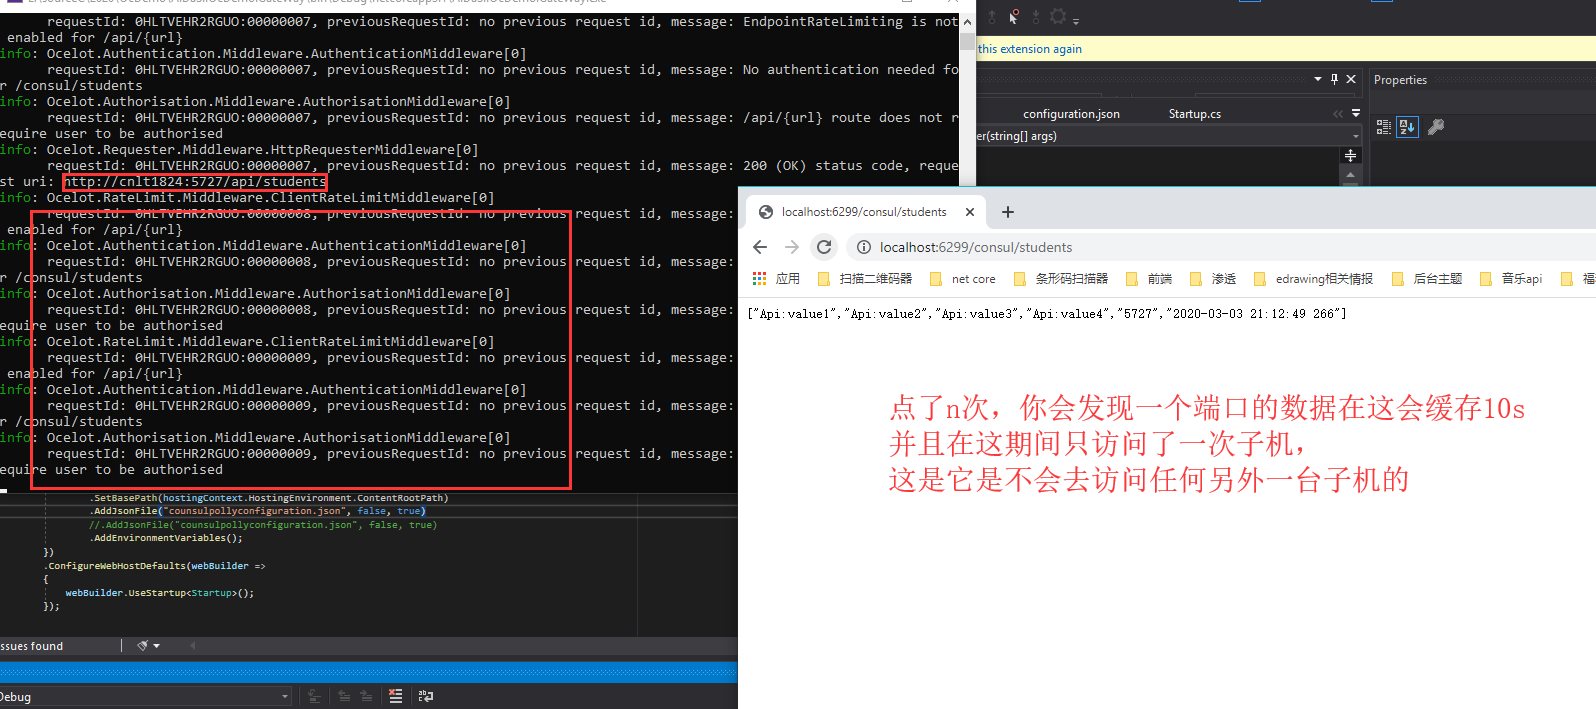
}这里我们缓存了 10s 我们一起来看看是怎么缓存的
感谢各位老铁的观看!!完结!!!撒花!!!

更多参考文献:
Jesse大佬的:
https://www.cnblogs.com/jesse2013/p/net-core-apigateway-ocelot-docs.html
http://www.jessetalk.cn/2018/03/19/net-core-apigateway-ocelot-docs/
欢迎加群讨论技术,1群:677373950(满了,可以加,但通过不了),2群:656732739
评价


排名
6
文章
6
粉丝
16
评论
8
{{item.articleTitle}}
{{item.blogName}} : {{item.content}}
ICP备案 :渝ICP备18016597号-1
网站信息:2018-2026TNBLOG.NET
技术交流:群号656732739
联系我们:contact@tnblog.net
公网安备: 50010702506256
50010702506256

欢迎加群交流技术